Saturday 26 January 2013

Seats

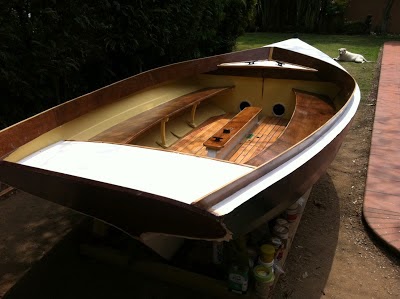
Starboard seat and floor soles dry fitted.  Note the seat support struts:
by the fourth one, I got pretty good at the single dovetail joint....
The floor soles (the planks above) aren't screwed down or fixed in proper position yet, they're just there to see how they fit.  In the final, they need to be spaced 1/8" to 1/4" apart.  Also, I'm going to attach them from underneath to each other with lengths of "Tiemu" (lit. "Ironwood", or Chinese hemlock), which will fit over the floor beams, so that the floor soles can be lifted out easily to get to the bilges. We still need to add two more shorter boards to each side, scribed to quite fine long angles.
[LATER: I've had to take out all the boards to try to dry them. The new ones, Port side, were wet on delivery -- the timber yard told me this, that Canada had sent them newly-cut timber.  I weighed them compared with the starboard ones, and the weigh 240g/board more, so we need to put them out in the sun to dry some.  Luckily this time of year is relatively dry, humidity only 50% so there's some chance that we'll be able to dry them off.  I'll measure them each day and only epoxy them, for protection, and reinstall them, when they're closer to the weight of the dry starboard boards]
Scribing the starboard seat to fit to the hull was easier than I thought.  No tricky bevels or cambers to deal with and I just used a made-up scribing gauge, made of a bit of ply with a permanent marker fitted to it, then run along the hull onto a long piece of scrap 1/4" ply, then cut that pattern and transfer to the final 3/4" ply. It worked pretty well and fitted first up.  Note the angle on the seats, which is deliberate, to make them more comfortable on a tack.
I'm going to do like Dave in California did, and add a trim to the edge of the ply, in my case 3/8" Ramin (Bai Mu, or, literally "white wood") a local fine-grained hardwood used in furniture trade, but which seems to work well for marine as well -- I used it to laminate the inner and outer stems, then epoxied to avoid rot.  I also used it to laminate the floor battens. So far so good, though we're not on the water yet...
Next is the port-side seat, final trim of the floor soles, and then loft and fit the coaming, which I'm going to make of ply, like Dave did.  Happens that I just have enough 3/8" ply to do it without ordering any more wood, and as Dave said it was tough to get the mahogany to fit without breaking.
I'm only doing the seat supports and not the lockers under the seats on the principle that (a) if you have any storage space, it'll get filled and (b) it's easier, which is important to a lazy sod like me.

Example of the principle that any available storage space will be filled -- just like Parkinson's Law that work will expand to take up the time available to do it -- is in the photo of the rear locker at left, which is already full of junk...
Saturday 19 January 2013

Floors

Will probably replace the outboard sole plank here by
a slightly longer one, scribed to the fine angle above.
These are just dry-fitted to see what they look like...

...  and they don't look too bad.  We need to take them off
and trim to final shape at the aft end.  Other than that, they
fit pretty well, given our very basic scribing skills.....
These are made from Douglas fir, 4" x 3/4" wide, ripped to 2" on the table saw.  I tried them at 4" but they looked a bit industrial.  These ones look pretty good, and smell nice, just after they've been cut.  The scent of new-cut wood....
They need to be removed and trimmed, with the scribed parts at the top of this picture evened out to a consistent even curve and the edges of all planks sanded down to round them off.

Tuesday 15 January 2013

White beauty: update photo

Photo taken this morning in our backyard.
We're now working on the floors and floor soles.   Next: seats and coaming.  We also have to finish off the side decks.  There's also the rail and toe rail to fit, to finish off the side decks.
The white paint is just an undercoat, to waterproof in case of rain.  Final colour scheme will be British Racing Green on hull, cream inside and trim in the green, similar to John Brookes' boat, above.  Will probably leave the front deck in white.
Then... to make the mold for the lead keel and cast it, at the Yacht Club.
Floor frames and fillers, now fixed in.  Next is floor cleats and floor beams,
then scribe and install the sole. That big lump of wood in the middle is
Batu (chao mu), a kind of Chinese mahogany, which will be trimmed
and shaped to be the top of the centreboard trunk, with a hole for the
centreboard lanyard.
UPDATE (19 Jan):
Floor frames and fillers installed
I decided not to screw the Floor Frame battens in by screw from below (as per the book), because I'm concerned about any through-hull fasteners (flexing could lead to leaks methinks..).  Instead we put in extra fillers, made from left-over marine ply stock from the planks.  We ground back the paint to make sure the epoxy and epoxy putty held.  They seem to be pretty solid.  Now for the floor beams and then the soles, which we're going to make with the 4"x 3/4" Douglas Fir cut to 2". 

Monday 7 January 2013

Stern deck installed

The stern deck beams and mini-stringers, as we did on the bow.
Note that we didn't do the side knees, just chocks.  That's the
deck sitting there on the centreboard trunk.

Stern deck installed, epoxied and the bulkhead dry fitted.  

This is the photo from the Somes Sound website.  See how much
ours above looks like this!  

In the "miscellanea" category: the tool box I made at the beginning of this
project.  Note the special place for the tape measure, boxes for screws, etc
and the end pieces for screw drivers.  It's worked really well.

And our constant companions on this build, sheltering
from the "cold" (12 C), hunkered up against the
only heating we have here in HK... Marcus on the seat,
Basil and Nikki...

Next three steps: (i) fit floor battens & soles, (ii) fit seats and (iii) fit coaming.
Then to work out how to make and fit the lead keel....